
I’ve been writing a lot of code in Lua for a game my kiddo and I are developing for Roblox. Last week we had a conversation about a cityscape we need to build. As we thought about the many ways we have to handle assembling large structures in Roblox – build them by hand ourselves, use stock Roblox assets, buy assets from others, or pay someone to build assets – I thought, hey, I can write some code to build these! So I walked away, and began to research how to get this done.
By trade, I write code and manage folks that write code that manages data. I’ve tried my hand at coding within games previously and never got very far. Though I’ve always been interested in writing code to show game graphics on the screen, I’ve never been sharp with the maths needed to do this. So having the opportunity and push to learn this was very welcomed!
This post will discuss some of my process as I worked through this.
Initial code
As I first started writing this code, I took popular formulas and translated them to Lua. I began searching for 3d graphics, 3d computer shape code, and other key phrases to find information on what I was trying to do. A few formulas I looked at were from Wikipedia and other sources, and were in standard mathematical notation. This meant attempting to code the formula as written, and then figuring out how to convert that to efficient code. A few were in code in other languages, Java and Python mostly, and were simply a matter of figuring out what the code looked like in Lua. As output I would print the Lua tables, full of coordinates, to screen and mentally assemble the shapes.
Next steps
As I worked through each solution, at first I didn’t write any loops. Instead, I would call the formula manually several times, passing in variables such as start and end coordinates. As my code began to produce proper coordinates, I used those coordinates to place 1x1x1 parts on the workspace. Once that looked appropriate I would add in different sized blocks. While working on the first solution, the Bresenham 3D line, I realized that end coordinates wouldn’t work within this context, and using the number of blocks we wanted to lay down instead of end coordinates fit the paradigm more closely. And success! We had code that would place a few blocks or sections by hand.
We then added in our loops, as well as adding in examples that had different start and end coordinates to produce floating cubes, diagonal lines, and overlapping spheres. There were some issues along the way. For example, our formulas didn’t account for anything other than a one stub sized part (a stub is a unit of part measure in Roblox). So we had to go through our coordinates generators and increase the X, Y or Z to compensate for parts larger than 1x1x1. Here’s an example from our cube generator, that compensates for the X axis by adding in the length, l, of the block.
		while (x1 ~= x2) do
			x1 = x1 + xs
			-- if it's not a straight line
			if (p1 >= 0) then
				y1 = y1 + ys
				p1 = p1 - 2 * dx
			end
			if (p2 >= 0) then
				z1 = z1 + zs
				p2 = p2 - 2 * dx
			end
			p1 = p1 + 2 * dy
			p2 = p2 + 2 * dz

			local xVal = x1 + (l-1)*i
			table.insert(ListOfPoints, {xVal, y1, z1})
			i = i + 1
		end
This solution places blocks end to end. If that’s not what’s needed, we could overlap blocks, though in a straight line this would be unacceptable.
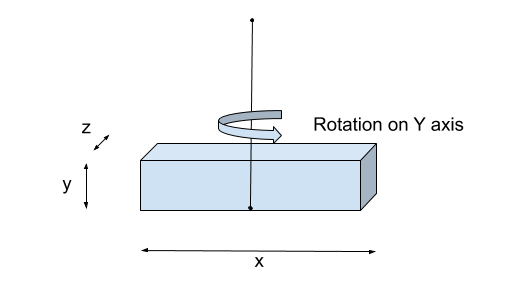
Another issue we ran in to was with our cube builder. We rotate our parts when moving in the X direction. When a part is rotated, it doesn’t change the X,Y or Z size. When changing the Rotation attribute it changes the part.Orientation.{x,y,z} values. To compensate for this, we swap our x and z values when we see the orientation on the y axis at 90 degrees. Why do we look at the y axis? Because it’s our vertical pole, which is the pole we rotate our part around in this exercise.
And here is the block of code we use to swap the x and y sizes.
	if part.Orientation.y == 90 then
		sizeX, sizeZ = sizeZ, sizeX
	end
Parts, Parts, Parts!
As we added more parts to a workspace, there was a need to add in models and attach the parts to a model. This would allow us to manage sections of our shapes without breaking an entire model, and were easier overall when looking at the final structure in the workspace. With the sphere, we simply put all of the parts into the top level of the model. But for the cube and pyramid we wanted more separation. We added a few layers of models, with “building”, “floor”, and “wall” being what we settled on. These of course could be changed to “pyramid”, “cube” and “face”.
The Refactor
When we code, unless we already know better from experience, we begin by writing our code out “long hand”. For example, in Lua we can initialize multiple variables on a single line, but when we’re initially writing the code we list them each on their own line. In this way we can not only see our code’s intent more clearly, but we can also add, update and replace code more easily during the process.
Once the code is working as we expected, we go back and find areas where we can make the code more maintainable, more succinct, and remove any duplication. For the code we’ve written in this post, it’s still a work in progress. There areas we focused on for this refactor were –
- Splitting out the code to produce the models at each level
- Moving the individual line drawing code out
- Splitting out the code for drawing a wall, floor or support
Here’s some of that code, to show you what we’ve done
local function getModel(name, parent)
	local model = Instance.new("Model")
	model.Parent = parent
	model.Name = name
	return model
end

local function drawLine(ListOfPoints, part, model)
	for i, points in ipairs(ListOfPoints) do
		local part = part:Clone()

		part.Position = Vector3.new(points[1], points[2], points[3])

		part.Anchored = true
		part.Parent = model
	end
end

local function fillFloor(x, y, z, l, h, w,model)
	local basePart = Instance.new("Part")
	local part = basePart:Clone()
	local floorFill = getModel('fill', model)
	for i = z, z+(w*part.Size.x), part.Size.z do
		local ListOfPoints = Bresenham3D(x, y, i, x+l, h, z, part.Size.x, part.Size.y, part.Size.z)
		drawLine(ListOfPoints, part, floorFill)
	end
	floorFill:MakeJoints()
end

local function drawFloorSupports(x, ys, ye ,z, model)
	local basePart = Instance.new("Part")
	local part = basePart:Clone()
	part.Size = Vector3.new(2,1,2)
	local ListOfPoints = Bresenham3D(x, ys, z, x, ye, z, part.Size.x, part.Size.y, part.Size.z)
	drawLine(ListOfPoints, part, model)
end

local function drawWall(x, y, z, l, h, w, part, model)
	local sizeX = part.Size.x
	local sizeY = part.Size.y
	local sizeZ = part.Size.z

	if part.Orientation.y == 90 then
		sizeX, sizeZ = sizeZ, sizeX
	end

	local ListOfPoints = Bresenham3D(x, y, z, l, h, w, sizeX, sizeY, sizeZ)
	drawLine(ListOfPoints, part, model)
end
We also began to add in a part parameter to our functions to allow us to pass in the particular part we wanted to use for a shape.
Wrap up
While we’re still working on this code, we’re really happy with the results to date. Not only are we feeling more confident with our coding in Lua for Roblox, but we’ve learned a lot about drawing shapes in code. We have a few items we still want to work on including
- Shifting blocks in each cube to give them more of a “brick” feel
- Adding in the possibility of leaving spaces for windows in our cubes and pyramids
- Shading our sphere
- Generating more shapes, such as cone
- Allowing rotation of shapes, such as circle and cube
I hope this was interesting, and informative in the process we used to learn how build shapes using Lua in Roblox. The code for these shapes, and more in the future, can be found on my Github account at https://github.com/woodsjs/roblox-scripts.
More code in python and javascript/typescript can be found on the CoderHaus repo at https://github.com/CoderHausTS