

Part of the work I do with a large healthcare organization is managing the webservices for the EHR (Electronic Health Record) system. Part of that management includes managing the FHIR (Fast Healthcare Interoperability Resources) APIs. To understand the client side of our APIs better, I have written several FHIR based apps. As I often do, I have written this post to touch on the topics and code related to implementing a FHIR web app.
This post discusses the areas of interest for implementing a FHIR app, including authentication and data retrieval. The post focuses on the FHIR services implementation by EHR vendor Epic Systems. At the time of this writing, their implementation uses the Authorization Grant flow for OAuth2, and supports both STU3 and R4 FHIR resources.
We could handle all of technical build by downloading app shells, like this smart-on-fhir shell, but I wanted to see all of the bits and how they work. And I feel there’s no better way than to build it ourselves! The implementation here is in no way complete. In addition this does not show a full architecture, or follow good coding practices for security. This is only to show you the steps involved in authentication, and show you some basic code to get you started.
FHIR dataflow basics
The FHIR dataflow is not unlike a standard oAuth2 and RESTful dataflow. If you are comfortable with any authentication and authorization flow, and calling APIs, you will be fine in the FHIR world. Let’s look at the full FHIR dataflow.
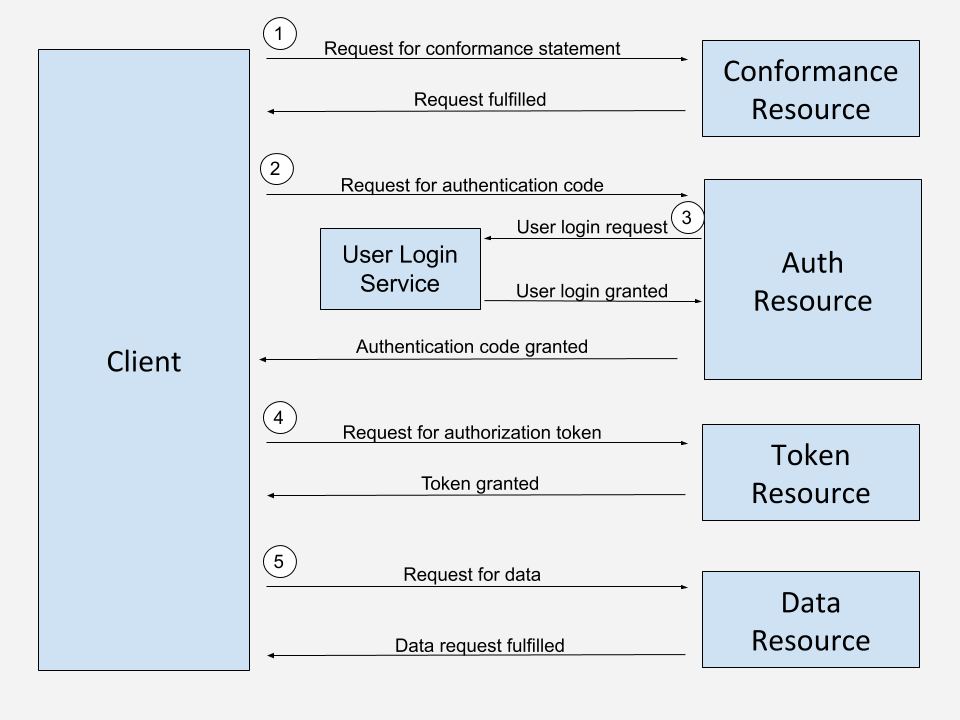
At label one, our client starts out by requesting the conformance statement. We’ll cover this more deeply below, the short of it is the conformance statement is a detailed description of the capabilities of the FHIR services. At labels two and three, we navigate the OAuth2 workflow, working through the standard user workflow to obtain our authentication code. At label four we exchange our authentication code for an access token. And at label five we begin to access our authorized resources for the data we desire.
To follow along with this guide, feel free to sign up for an account with an EHR vendor (more below), or use one of the freely available FHIR services servers located at https://wiki.hl7.org/Publicly_Available_FHIR_Servers_for_testing
Where are our resources? What is a conformance statement?
Within FHIR, each data “bucket” is called a resource. These resources follow the USCDI (United States Core Data for Interoperability) standard, and offer us buckets such as Allergies, Immunizations, Medications, and Goals. To understand what resources are available to us with any instance of FHIR, we need to start every interaction with FHIR by obtaining the Conformance Statement. The conformance statement is a product of other data exchange protocols used in medical data circles, coming from DICOM, or Digital Imaging and Communications in Medicine. The conformance statement can be obtained at the metadata location of the base URL, and you do not need to authenticate or have a client ID to obtain this document. An example of a conformance statement can be found at http://hapi.fhir.org/baseR4/metadata
The conformance statement will give you overall information to ensure you are using, for example, the proper version of FHIR. It tells you what EHR software is driving the FHIR data. Two of the more important areas of the conformance statement, are that it gives you the URI of the authentication and token resources to start your OAuth2 workflows. The conformance statement also contains a resource section, that details what resources are available to you in this implementation and gives details on access and data availability of these resources.
Getting your open.epic account
If you want to access FHIR data from EHRs, you’ll need to sign up for developer account and register the app. This will give you a client ID, a token that allows your application to access FHIR data. This is an API key. The two big players in the EHR space are Epic and Cerner, so go ahead and register on their sites.
Adding runtime configuration
As we like to do with our apps, we set up runtime configuration, that will not be pushed to our repo, by following the example on Microsoft’s devblog site at https://devblogs.microsoft.com/premier-developer/angular-how-to-editable-config-files/.
One item that’s not included here, is to be sure you exclude your config files from being pushed to our git repo. You can do that by adding the following line to your .gitignore
# secrets
/src/assets/config/*.json
After this, the configuration file is managed outside of github and added by our CI or manually. My config model for FHIR initially will look like this.
export interface AppConfig {
    env: {
        name: string;
        title: string;
    };
    fhir: {
      baseURL: string;
      clientId: string;
      redirectUrl: string;
    }
}
Building our Auth request
After obtaining the conformance statement, the FHIR dataflow begins with a standard OAuth2 workflow. In the case of FHIR you’ll find that most EHR vendors use the Authorization Code Grant flow.
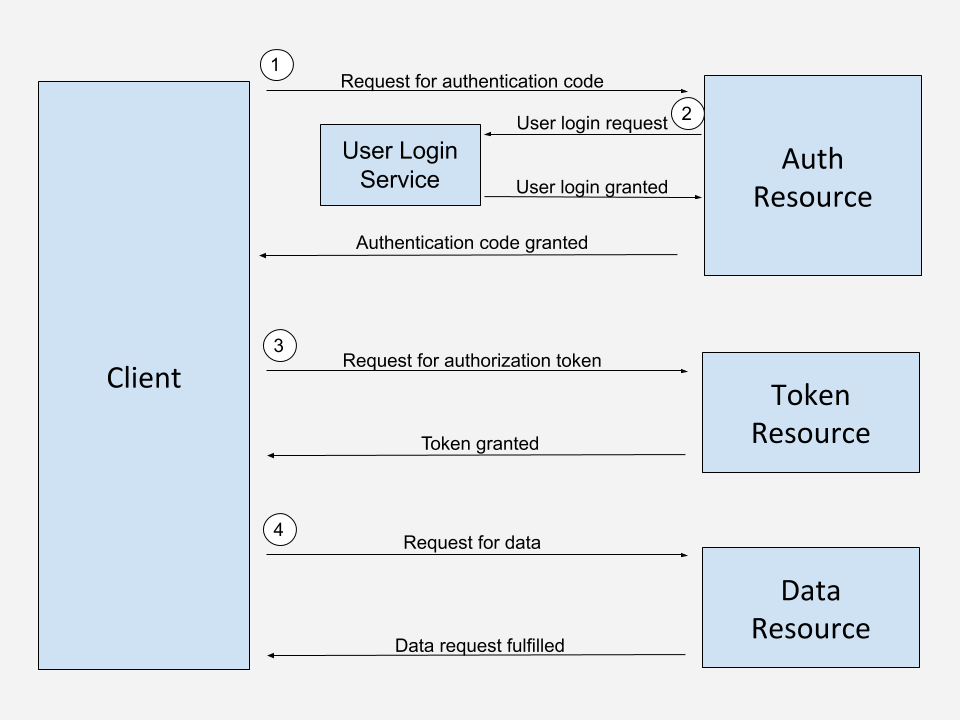
We start the attempt at obtaining an Authorization Code, seen at label one in the diagram above. This code will later be exchanged for our token. In our code below, we have a few pieces of data we need to generate a request.
CLIENT_ID – This is your app specific API key, obtained when registering with the vendor. You’ll want to keep this safe and secure. Using a service such as AWS Secrets Manager is a good option.
FHIR_REDIRECT_URL – you will register this with the vendor when you obtain your API key. Any request for redirect that does not match the registered redirect URI will fail. This is a another method of ensuring bad actors do not hijack a user’s session. In most implementations you can register multiple redirect URIs, so you will want to register both your final production location, as well as one you will use for testing such as localhost:4200/auth.
AUTH_URL – This is the location of the EHR’s authorization URL. You’ll obtain this from the conformance statement, discussed above.
We build our URL parameters using the HttpParams method, and the fromObject parameter. The required parameters for most OAuth2 calls related to FHIR are
{
        response_type: // This is the grant type. It can be "code" or "grant". For most FHIR implementations you will use "code".
        client_id: // Your client ID. The API key.
        redirect_uri: // Within your app, where the user will be redirected to, after logging in to the User Login Service at label 2 in our diagram.
        scope: // Not used in Epic's implementation of FHIR
        state: // Not used in Epic's implementation of FHIR. This is a value used to maintain state between client and server.
        // code_challenge: Implementations of FHIR are beginning to support PKCE, Proof Key for Code Exchange. Implementation is out of scope for this post.
        // code_challenge_method: 'S256', Epic's implementation of FHIR uses Sha256 for it's PKCE implementation.
},
After we make our GET request to the authorization endpoint, we are going to be redirected to the EHR’s user authorization server. For Epic this will be handled by MyChart, their patient portal. This is shown at label two above. For our code implementation, we will use
window.location.href = this.authorizationURL + '?' + params.toString();
We use window.location.href to keep our user in the same tab/window during the flow. Some implementations pop the user out into another window, but I do not like that flow from a user perspective. Here is the full code for this part of the workflow, which you should note is short and sweet!
  fetchAuthorizationCode() {
    const responseType = 'code';
    const clientId = CLIENT_ID;
    const redirectUri = FHIR_REDIRECT_URL;

    this.authorizationURL = AUTH_URL;

    const params = new HttpParams({
      fromObject: {
        response_type: responseType,
        client_id: clientId,
        redirect_uri: redirectUri,
        scope: '',
        state: '',
        // code_challenge: PKCE_CODE_CHALLENGE,
        // code_challenge_method: 'S256',
      },
    });

    window.location.href = this.authorizationURL + '?' + params.toString();
  }
Once the user authenticates using MyChart, they are given a prompt to authorize access to our application. Once they authorize access, they are redirected back to our app. The URL now contains the authentication code as a parameter in our URL.
https://our.example.com/auth?code=<<code>>
We pull the code off and store it. What we are not showing in these examples is the use of RxJS to save state. This is a must as we are shuffling around our implementation and need to save pieces such as the authorization code. Another nice piece I like to do is remove the code parameter from the URL bar in the browser, so the user continues to only see our
    this.route.queryParamMap.subscribe((params: Params) => {
      this.codeParam = params.params.code;
    });

    if (this.codeParam) {
      this.authService.setAuthorizationCode(this.codeParam);
      window.history.replaceState({}, document.title, '/');
}
We now have our authorization code, which is the OAuth workflow’s step of verifying that our app is registered, and that our user is who they say they are. We are now ready to request our token at step 3 above. The token is what will be used to request data from the FHIR resources. In addition we will also receive our user’s patient OID. This is the object ID that represents the user in the EHR database. This is NOT the MRN (Medical Record Number) but a construct use for FHIR data retreival.
We start our request very much in the same way we did our authorization code flow above. We gather the data we need from our observables such as the TOKEN_URL from our conformance statement and our client ID. What we add here is our authorization code, obtained in the step above.
Another piece we add here is the header with content type of ‘application/x-www-form-urlencoded’.
    const httpOptions = {
      headers: new HttpHeaders({
        'Content-Type': 'application/x-www-form-urlencoded',
      }),
    };
NOTE: When you are developing a javascript app for OAuth2, do NOT add Authorization: Basic <<code>> to your header. This generates a preflight check, based on the CORS standard, and in the case of the OAuth2 workflow will cause your request to fail.
This content type is defined by the W3C and is used for POST requests, which is what we will be using here. The format specifies that data is key/value encoded, and separated by ‘=’. Each tuple is separated by ‘&’. As a reminder, POST requests contain the data in the body, not the URI. So how are we going to do this? Since this is the standard format for our URI, we can use the same methodology as above with a call to HttpParams.
    const body = new HttpParams({
      fromObject: {
        grant_type: // is often set to password. In this case, we set the value to 'authorization_code, as that's the data type we are using.
        code: // The authorization code obtained in labels 1,2,
        redirect_uri: // Our registered redirect URI, If you have multiple URI's registered, this can be different from the step above.
        client_id: // Our registered client ID.
        // code_verifier: If you are using PKCE, the verifier used to generate teh code challenge.
      },
    });
We now have the data we need. We make a post call to our token endpoint to end the flow. Here we use a post request, hit our token URL, and add our body.
    this.http.post(tokenURL, body.toString(), httpOptions).subscribe((data) => {
      this.parseTokenResponse(data);
You will receive a response, with our data in the body ready to parse. This data includes the following.
  access_token: // Our generated access token, used during each FHIR request
  token_type: // "bearer", our RFC 6750 token type
  expires_in: // How long you can use the token, in seconds
  scope: // A string of resources you can access, such as Medication.read Medication.search MEDICATIONSTATEMENT.READ MEDICATIONSTATEMENT.SEARCH.
  patient: // The patient's OID, used during FHIR requests
Once again, we should store this data for use during our FHIR requests. At this point, we have gone through the OAuth2 dataflow and are ready to retrieve patient data. Here is the full code from above.
NOTE: If you want to implement PKCE, and do it yourself, check out this easy implementation https://github.com/aaronpk/pkce-vanilla-js.
  fetchAuthorizationToken() {
    let tokenURL = TOKEN_URL;
    let grantType = 'authorization_code';
    let redirectURI = FHIR_REDIRECT_URI;
    let clientID = CLIENT_ID;
    let authorizationCode = AUTHORIZATION_CODE;

    const httpOptions = {
      headers: new HttpHeaders({
        'Content-Type': 'application/x-www-form-urlencoded',
      }),
    };

    const body = new HttpParams({
      fromObject: {
        grant_type: grantType,
        code: authorizationCode,
        redirect_uri: redirectURI,
        client_id: clientID,
        // code_verifier: this.codeVerifier
      },
    });

    this.http.post(tokenURL, body.toString(), httpOptions).subscribe((data) => {
      this.parseTokenResponse(data);
    });
  }
Here are a few resources on authentication with Epic’s OAuth2 implementation to fill in more details –
https://open.epic.com/Tutorial/PatientAuthentication
https://open.epic.com/Tutorial/OAuth
Getting data from FHIR resources
Now that we are authenticated, we can begin requesting data. There’s nothing magic about this portion. While there are libraries available that we can use to get key pieces of FHIR data, we can also just make a get request and parse the data ourselves. A key part of this is understanding the shape of our FHIR data. Epic has great resources at https://open.epic.com and the developer of the FHIR spec does as well at https://www.hl7.org/fhir/
Here we’re going to grab some of the MedicationStatement data. First we will look on open.epic to find which resource I’m going to hit. Then I check scope from our authorization flow to be sure my client ID is authorized for that endpoint. Once I’m ready I’ll review the shape of our data, and what data is available. Here is an example get request we would use.
    this.http
      .get(
        FHIR_BASE_URL +
          `MedicationStatement?patient=${this.patient}`
      )
      .subscribe((data) => {
        {
          this.patientData = data;
        }
      });
A good practice would be to build a service that parses our FHIR data, but we’ll dive right into the HTML and grab the data we need. Looking at the data shape, we know that our provider and medication name will be located at entry->resource->informationSource->display and entry->resource->medicationCodeableConcept->text respectively. Also, there might be many medications so we build a simple div using ngFor, looking at each entry and displaying the data we want.
<div *ngFor="let entry of patientData?.entry">
  <span>Provider: {{entry.resource.informationSource.display}}</span>
  <span>Medication: {{entry.resource.medicationCodeableConcept.text}}</span>
</div>
Wrap up
Overall, FHIR is not unlike any other API based data retrieval. We authorize our application, authenticate the user, and grab data. Two important parts of this flow are understanding the shape of the conformance statement so that we can know how and where to retrieve our data, as well as understanding the shape of the FHIR data itself.
While we could have stood on the shoulders of giants and used libraries for everything we’ve done here, there are some good resources on OAuth2 for example, it’s important to understand the full flow in case you run into issues. I hope I’ve helped with some of that understanding here.
I haven’t shown a full implementation of the FHIR dataflow. There are a few good app shells available, including the smart-on-fhir shell on github.