
Without a User Interface, our application is just…well really it’s probably still super useful! But if we want our application to be useful to the non-superhero non-programmer, we’ll probably want to add some type of UI to it.
There are a lot of elements that can go into a UI, dialogs, lists, spinners, media, buttons. Even the data itself can be looked at on the front end as a UI element that contains or is built of fonts, spacing, positioning. And if you’re using Angular, we can be safe to say that the UI is a terribly important part of your application. And because of this, we need to test it.
In our example below, we’re interested in “non-interactive” elements which would include headings, lists, icons, spinners, dialogs and the data we display in and around them. Specifically here we’re testing tooltips. We’ll save more interactive elements like buttons, checkboxes and drop downs for other exercises.
Testing Tooltips
Our element under test is our venerable tooltip. Providing user direction and context is important. The tooltip gives us a way to do this without adding reams of text onto our UI, to maintain a clean look. And while the scope of testing a tooltip is limited, at times you’ll find yourself needing to do it.
With our tests, we used Angular Material tooltips. These use the Angular Material CDK Overlay, essentially a document that hovers over your base document, in order to render objects that appear to hover over your elements. With this use of the CDK Overlay, testing can seem a bit tricky. We need to somehow figure out where our element’s tooltip is pointing to, and then find it in the DOM. Here’s how we do it.
Our code is fairly simple. On the front end we have a button and input element, both that contain tooltips. When the button is pressed the input element’s tooltip changes. Here’s our typescript code that handles the storage of the tooltip’s text, as well as the click even that changes that text on the input element.
import { Component, OnInit } from '@angular/core';

@Component({
  selector: 'app-tooltip-ut',
  templateUrl: './tooltip-ut.component.html',
  styleUrls: ['./tooltip-ut.component.css']
})
export class TooltipUtComponent implements OnInit {

  constructor() { }

  public tooltipText = 'bliggle';
  public inputTooltipText = 'blaggle';

  // the aria-describedby cannot hold more than 30 chars at the time of this writing
  // so let's do something long that would get cut off normally
  public changedInputTooltipText = 'You know what it\'s for, you just did the thing!';

  ngOnInit() {
    this.tooltipText = 'Hi y\'all!  I\'m the tooltip!';
    this.inputTooltipText = 'I\'m a fancy tolltip for an input box!';
  }

  onClick() {
    this.inputTooltipText = this.changedInputTooltipText;
  }
}
Really, our component’s html is not very exciting either. We’ve added our matToolTip attribute to each element, which points to a variable in the typescript file. On click, the button triggers our method which changes the tooltip text on the input element.
<input type="text" name="someText" id="someText" matTooltip={{inputTooltipText}}>

<button mat-raised-button
        matTooltip={{tooltipText}}
        aria-label="Button that displays tooltip"
        (click)="onClick()">
  Hover me!
</button>
Breaking down the test spec
We’ll break down our test spec, and go over section by section how and why we handled the testing as we did. At the end of this section we show the full test spec, in its full glory.
To test this, we first need to import the MatTooltipModule and add it in our testbed configuration as an import. If we don’t take this step, we’ll get errors that the tooltip module is not a known property.
import { MatTooltipModule } from '@angular/material/tooltip';

TestBed.configureTestingModule({
    declarations: [TooltipUtComponent],
    imports: [MatTooltipModule]
}).compileComponents();
We then have our first it block, and our test. Here we’re testing the tooltip attached to the button. Because our floating element, the tooltip, uses the CDK Overlay and our button itself is on the main document, we need to find a way to connect our button element with the tooltip it hosts.
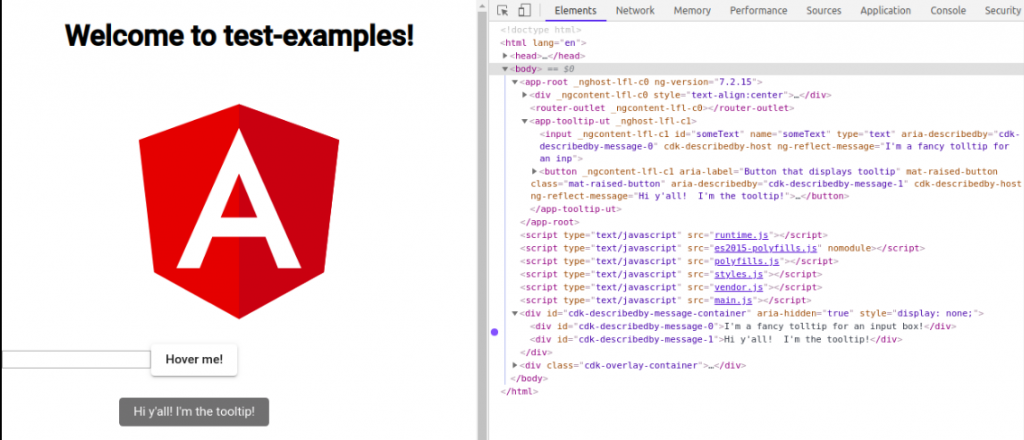
Since we’re using Angular Material tooltips, we’ll find that link in the aria-described by attribute. This attribute takes the form aria-describedby=”cdk-describedby-message-NN” where NN is an autogenerated and incremented number. This attribute’s text is the id attribute of the div that contains our message. And this div lives inside the div with the id of cdk-describedby-message-container, which is our CDK overlay container. Here is what that hierarchy looks like in our sample code.
One place where I was getting caught was looking for this div in our component. After a few failed attempts to output anything related to the CDK overlay div I realized that I needed to look at the document level. And since we’re selecting by the id attribute of the element, there should be exactly one of these found with querySelector(). We add a hashtag at the front of our text to tell querySelector() that this is an id attribute.
const divato = document.querySelector(
    '#' + button.getAttribute('aria-describedby')
);
Finally we can grab our tooltip text, right from the CDK overlay which holds our tooltip. We could have used InnerHTML here as well as textContent.
expect(divato.textContent).toEqual(component.tooltipText);
And here’s our full it block for this test.
it('should have the tooltip on the button', () => {
    const buttonDe: DebugElement = fixture.debugElement;
    const buttonEl: HTMLElement = buttonDe.nativeElement;
    const button = buttonEl.querySelector('button');

    const divato = document.querySelector(
      '#' + button.getAttribute('aria-describedby')
    );

    expect(divato.textContent).toEqual(component.tooltipText);
});
Testing the tooltip on our input element would be similar, only we would use ‘input’ for our querySelector. If you have multiple buttons or inputs, use the appropriate selector such as an id attribute.
Now we’re going to test our tooltip change. We’re taking the approach of testing this in the DOM and not just by checking that the values of our variables are changing in the code. You’ll notice this is the same approach we took above. Why you ask? What if I was updating the html and changed or added the wrong variable for the tooltip text on that input? Or maybe I had more going on in my triggered method to change the tooltip text, and I auto-completed the wrong tooltip into the code? I might not catch that in a purely code test situation.
Another question I asked myself while writing this, is why don’t we test deeper on the DOM for this? For example, does the tooltip show when we hover? Well, we might want to. I had a test in here that did just that. We would be getting dangerously close to moving into the business of testing code that wasn’t ours, which we’re already a bit there, but let’s not go any further in that direction. At that point we should be thinking, are we testing our code or the framework’s code.
In this it block, we’ll need to have our button around so we can click it to change the tooltip text. Honestly I can’t remember the last time I did that but I wanted to add a little complexity in our example. So like in the code above we find our button element, and then use the same method to find our input element. We also could have been more generic in the naming of our DebugElement and HTMLElement and reused those two consts.
We check the default value of the input, prior to change.
const divato = document.querySelector(
    '#' + input.getAttribute('aria-describedby')
);

expect(divato.textContent).toEqual(component.inputTooltipText);
We then need to click our button and detect those changes. Here click() is a built in method for our button element. If we don’t detect the changes in our fixture after this, we won’t see the result. Finally we grab our attribute again and test it against the changedInputTooltipText variable in our component’s typescript file.
button.click();
fixture.detectChanges();

const changedDivato = document.querySelector(
    '#' + input.getAttribute('aria-describedby')
);

expect(changedDivato.textContent).toEqual(component.changedInputTooltipText);
Here’s the full it block for this test.
  it('should change the input tooltip text when the button is clicked', () => {
    const buttonDe: DebugElement = fixture.debugElement;
    const buttonEl: HTMLElement = buttonDe.nativeElement;
    const button = buttonEl.querySelector('button');

    const inputDe: DebugElement = fixture.debugElement;
    const inputEl: HTMLElement = inputDe.nativeElement;
    const input = inputEl.querySelector('input');

    const divato = document.querySelector(
      '#' + input.getAttribute('aria-describedby')
    );

expect(divato.textContent).toEqual(component.inputTooltipText);

    button.click();
    fixture.detectChanges();

    const changedDivato = document.querySelector(
      '#' + input.getAttribute('aria-describedby')
    );

expect(changedDivato.textContent).toEqual(component.changedInputTooltipText);
  });
});
And here’s our full test spec.
import { async, ComponentFixture, TestBed } from '@angular/core/testing';
import { MatTooltipModule } from '@angular/material/tooltip';
import { DebugElement } from '@angular/core';

import { TooltipUtComponent } from './tooltip-ut.component';

describe('ui-noninteractive - TooltipUtComponent', () => {
  let component: TooltipUtComponent;
  let fixture: ComponentFixture<TooltipUtComponent>;

  beforeEach(async(() => {
    TestBed.configureTestingModule({
      declarations: [TooltipUtComponent],
      imports: [MatTooltipModule]
    }).compileComponents();
  }));

  beforeEach(() => {
    fixture = TestBed.createComponent(TooltipUtComponent);
    component = fixture.componentInstance;
    fixture.detectChanges();
  });

  it('should create', () => {
    expect(component).toBeTruthy();
  });

  it('should have the tooltip on the button', () => {
    const buttonDe: DebugElement = fixture.debugElement;
    const buttonEl: HTMLElement = buttonDe.nativeElement;
    const button = buttonEl.querySelector('button');

    const divato = document.querySelector(
      '#' + button.getAttribute('aria-describedby')
    );

    expect(divato.textContent).toEqual(component.tooltipText);
  });

  it('should have the default tooltip on the input', () => {
    const inputDe: DebugElement = fixture.debugElement;
    const inputEl: HTMLElement = inputDe.nativeElement;
    const input = inputEl.querySelector('input');

    const divato = document.querySelector(
      '#' + input.getAttribute('aria-describedby')
    );

    expect(divato.textContent).toEqual(component.inputTooltipText);
  });

  it('should change the input tooltip text when the button is clicked', () => {
    const bannerDe: DebugElement = fixture.debugElement;
    const bannerEl: HTMLElement = bannerDe.nativeElement;
    const button = bannerEl.querySelector('button');

    const inputDe: DebugElement = fixture.debugElement;
    const inputEl: HTMLElement = inputDe.nativeElement;
    const input = inputEl.querySelector('input');

    const divato = document.querySelector(
      '#' + input.getAttribute('aria-describedby')
    );
    expect(divato.textContent).toEqual(component.inputTooltipText);

    button.click();
    fixture.detectChanges();

    const changedDivato = document.querySelector(
      '#' + input.getAttribute('aria-describedby')
    );
    expect(changedDivato.textContent).toEqual(component.changedInputTooltipText);
  });
});
The tests here feel a bit contrived, and our it statements don’t fit into our model of Behavior Driven Development. Also our goal in testing shouldn’t be individual element based it should be looking for outcomes of a workflow. Testing a user expectation. Despite these, I think this fits my goal of showing how you could test tooltips from a technology perspective. It’s important when building good tests of our SUT (System Under Test) to not rely on testing only our back end code, but what it triggers on the front end for the user. Remember, the point of unit tests is to completely isolate your SUT (System Under Test) and ensure it gives expected outputs, including at the UI. This will help with determining where the source of issues (regressions) is.
All of the code shown here, and more Angular tests, can be found in this GitHub repo.